
Containerization & Docker Fundamentals
What if we ACTUALLY deliver our computer? Let's see how Containerization and Docker solve the "works on my computer" problem.

Setting up a machine to run some applications is a repetitive task and doing it manually can lead to irreversible problems.
Along with that, there is a common phrase:

Is there a more suitable way?
What if we deliver our computer?
Or do we create our application in production like a computer and then deliver that computer?
This is where containerization comes into play.
Containerization
Containerization is a way to develop, deliver, and deploy applications as a single unit.
It will allow us to create and deliver the application, needed libraries, and OS as a single unit called Container Image.
These Images can be shared via container registries as a software package and can further be customized via Environment Variables.
The best part is that you can build images on top of other images as layers
Let's take a look at an example of a container image:
FROM ubuntu:20.04
RUN apt-get update \
    && apt-get install -y --no-install-recommends mysql-client \
    && rm -rf /var/lib/apt/lists/*
ENTRYPOINT ["mysql"]
OR similar with Alpine Image
FROM alpine:3.14
RUN apk add --no-cache mysql-client
ENTRYPOINT ["mysql"]
Containers & Images
For a containerized application, anything that is executed on a host machine is called a Container.
Images are blueprints from which the containers are created.
When developing an application, we will usually create an Image of the container and ship it via container registries.
When we need to execute this image, we will simply run this image and create a container from it.
Docker
Docker is the leading tool in container technology. It provides the necessary tools to create and manage the Images and Containers.
The above example of Container Image specification is for Docker:
FROM alpine:3.14
RUN apk add --no-cache mysql-client
ENTRYPOINT ["mysql"]
In this specification, we are using the Alpine Linux image as our base image and adding MySQL on top of it
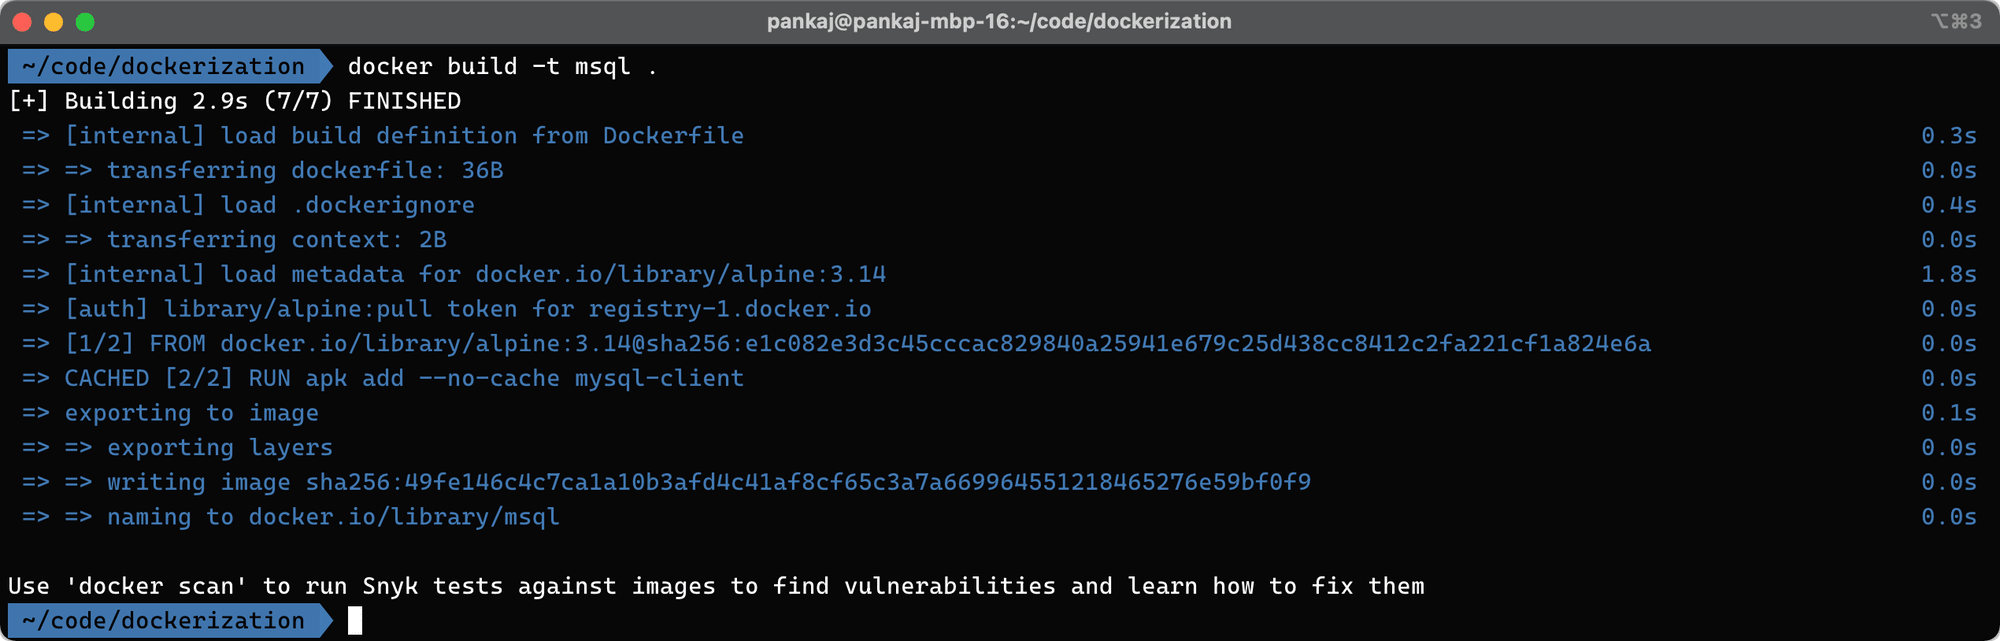
Let's try to build and run the above container:
// build the image with tag 'msql'
docker build -t msql .

// let's run the image with the above built tag
 docker run -d msql
From the above commands, the build will show the following output:
And on run the following will be the output:

In the above screenshot, I have used the command docker ps -al to list all the running containers.
Now, what if I want some additional CLI utilities?
Additional System Dependencies
Let's imagine a Web API in NodeJS that you need to use ffmpeg to generate a thumbnail of the video.
We would need to have a system ready with node.js and ffmpeg; we can use the following Dockerfile to generate a system image of our needs:
FROM alpine:3.14
RUN apk add nodejs-current --no-cache --repository="http://dl-cdn.alpinelinux.org/alpine/v3.14/main/" \
  && apk add ffmpeg
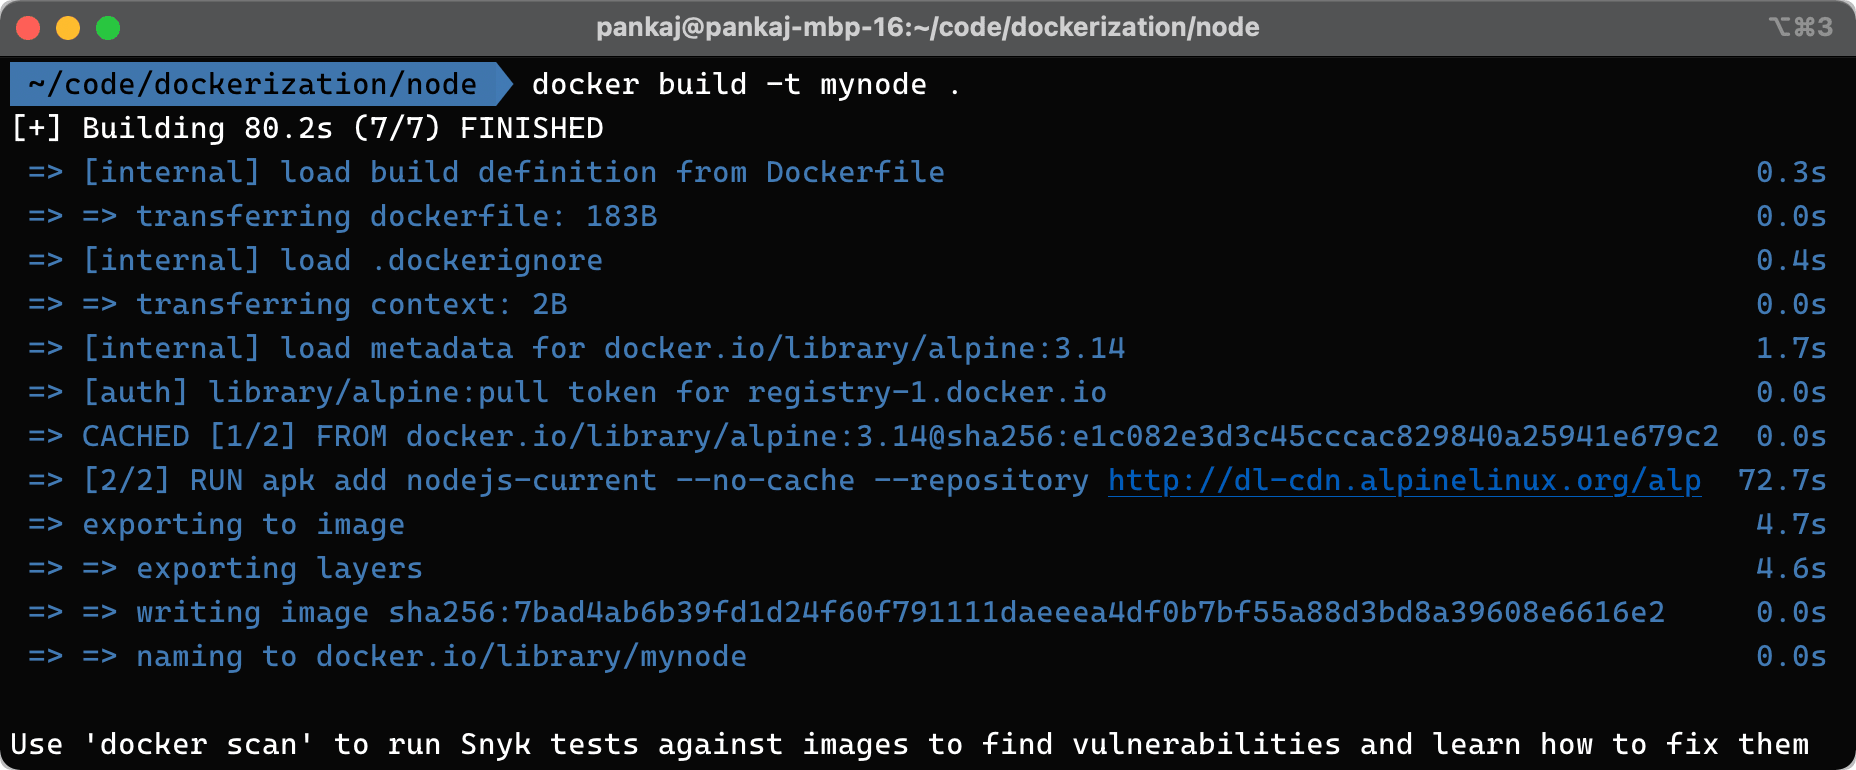
And let's build this image with docker build -t mynode . in the same directory of above Dockerfile
The following output will be available, meaning that the image was built successfully:
Let's go ahead with the following express app which adds a route to upload a video and generate five thumbnails from the initial 10 seconds consecutively.
/**
 * Code Samples are inspired from
 * - https://expressjs.com/en/5x/api.html#req.body
 * - https://www.npmjs.com/package/ffmpeg
 */

const path = require('path')
const multer = require('multer')
const ffmpeg = require('ffmpeg')
const express = require('express')
const bodyParser = require('body-parser')

const app = express();

app.use(bodyParser.json()); // for parsing application/json
app.use(bodyParser.urlencoded({ extended: true })); // for parsing application/x-www-form-urlencoded

const storage = multer.diskStorage({
  destination: function (req, file, cb) { cb(null, './temp'); },
  filename: function (req, file, cb) {
    const uniqueSuffix = `${Date.now()}-${Math.round(Math.random() * 1E9)}`;
    cb(null, `${file.fieldname}-${uniqueSuffix}`);
  }
});

const upload = multer({ storage: storage, limits: {
  fileSize: process.env.MAX_SIZE || 10 * 10 * 1024 // 10MB
} });

app.post('/upload', upload.single('video_file'), async function (req, res) {
  console.log(req.file)
  const name = req.file.originalname.replace(/\s/ig, '_')
  const saveTo = path.join(process.cwd(), 'extracts', name);
  try {
    var proc = new ffmpeg(req.file.path);
    return proc.then(video => video.fnExtractFrameToJPG(saveTo, {
        every_n_seconds: 2,
        number : 5,
        file_name : `${name}_%t_%s`
      }))
    .then(files => files.map(n => n.replace(saveTo, `/out/${name}`)))
    .then(files => { res.json(files) })
  } catch (e) { console.error(e); }
});

app.get('/', express.static(path.join(__dirname, 'public')));
app.get('/out', express.static(path.join(__dirname, 'exports')));

app.listen(process.env.PORT || 3000, function () {
  console.log('server is ready', process.env.PORT || 3000);
});
Considering that the above app is in the same directory as of Dockerfile, we will add a few more lines to the package express app in the image
FROM alpine:3.14
RUN apk add --no-cache --repository http://dl-cdn.alpinelinux.org/alpine/v3.14/main/ \
  nodejs-current \
  ffmpeg \
  bash \
  npm

RUN echo "\nNode: " && node -v \
    && echo "\nNPM: " && npm -v

ARG PORT
ENV PORT ${PORT:-3000}

ARG APP_DIR
ENV APP_DIR ${APP_DIR:-app}

WORKDIR ${APP_DIR}

COPY . .

CMD [ "chown ./temp" ]

RUN npm ci --prod

ENTRYPOINT [ "node", "index.js" ]
With the above Dockerfile and app, we can build our node.js express app with the following command:
docker build -t mynode-app .
It will take a while to finish building for the first time as it will try to download all the needed base layers and dependencies. But subsequent runs should be faster.
Here we are passing -t to tag the built image with the name mynode-app
Now once the app's docker image is built, we can run the image with the following command:
docker run --rm -d -p 3001:3000 -e MAX_SIZE=204800 mynode-app
A few things are happening in the above command:
--rmRemove the container when stopped-dRun the container in demon mode i.e. in the background-p 3001:3000Map the port system's 3001 port to the container's 3000 port-e MAX_SIZE=204800passes the environment variable to the container, in this case, the environment variableMAX_SIZEis set with the value204800
And with the above container up and running, we can visit http://localhost:3001 to see our new application
Volumes
We have seen how to bundle our application as an image and run it as a container.
But while our app is running, it will generate some data which is crucial for business safekeeping. How do we get it out of the container?
The answer is Docker Volumes.
By default, the container's data will be wiped out as soon as the container is removed.
We will attach the host OS's directory to One of the container's known places where the App will keep storing data.
As the data is stored in a mounted host directory, it is readily available outside the container and can be moved to a different place or backed up for the next container execution.
We can attach volume with -v or --mount flag when creating the container with docker run
docker run -d \
  -p 3001:3000 \
  -e MAX_SIZE=204800 \
  --mount source=nodeVol,target=/app \
  mynode-app

# or

docker run -d \
  -p 3001:3000 \
  -e MAX_SIZE=204800 \
  -v nodeVol:/app \
  mynode-app
But you can still not see the content on the volume as we are not creating the volume mapped to any local directory, hence the Docker engine will take over and assign a default directory for this volume.
To, do so, we need to tell the source and map it to the target. The following version of the above command will do so:
docker run -d \
  -p 3001:3000 \
  -e MAX_SIZE=204800 \
  --mount source=$(pwd),target=/app \
  mynode-app

# or

docker run -d \
  -p 3001:3000 \
  -e MAX_SIZE=204800 \
  -v $(pwd):/app \
  mynode-app
As we have seen a method to mount the host directory to the container.
There are Docker volume plugins to use AWS S3 Buckets, DigitalOcean Volumes, etc directly mounted to the containers which ease the data backup and restore processes.
Docker Compose
With applications expanding over time and needing some elaborate input from the host OS, the CLI Flags start becoming lengthy and hard to manage.
Docker-compose provides the ability to execute containers from specified images with the help of a descriptor file called compose file.
This file is usually named as docker-compose.yml and if no file is specified, the docker-compose or docker compose will look for this file.
This fill has different sections to define the networks, images, environments, volumes, etc to have fine-grain control over the container execution.
This fine-grain control over Container execution can be called (mini) container orchestration as it offers some level of resiliency to get the containers running again if they go down.
For more elaborate container orchestration, more industry standard tools like docker swarm and Kubernetes are recommended.
Let's take a look at the simple docker-compose file for the application we created earlier:
# Docker compose for mynode-app
version: "3.4"

services:
  screenshotter:
    container_name: screenshotter
    build: .
    environment:
      - MAX_SIZE=204800
    ports:
      - 3001:3000
    volumes:
      - ./extracts:/app/extracts
      - ./temp:/app/temp
With above docker-compose.yml file, we can trigger a build with:
docker-compose build
After that, we can spin up the container with the following command:
docker-compose up -d
Few notes:
-dThis flag will start the container in demon mode, just likedocker run- By default
docker-composeis looking fordocker-compose.ymlfile, but you can mention the file with--fileflag --file docker-compose.dev.ymlThis flag will make docker-compose to load the configuration fromdocker-compose.dev.ymlfile
With this, now we can spin up containers without having to enter too many flags and be prone to errors.
The above docker-compose file is very basic and solves basic stand-alone services/applications.
For a more elaborate setup of services/apps, we would need a more elaborate compose file which we will be discussing in the next article.
Build Automation
Now that we have a simple way to build our production computer locally and develop in it; or to say, deliver our development machine to Production.
However, you might notice that building/bundling the application you want to deliver takes time.
We can improve this by separating the build (docker build) and deploy (docker run) steps.
How do we separate the steps? By offloading the build step to automated build tools like GitHub Actions/Gitlab CI-CD/Pipelines etc.
However, the built image should be stored somewhere so that it can be retrieved for deployment. For this purpose, Container Registries exist. Popular ones are:
Let's take a look at Github Actions to build and push docker images to Docker Hub and Github Container Registry:
name: Docker Image CI

on:
  push:
    branches: [ main ]
  pull_request:
    branches: [ main ]

env:
  IMAGE_NAME: screenshotter

jobs:
  # Push image to GitHub Packages.
  # See also https://docs.docker.com/docker-hub/builds/
  build-and-push:
    runs-on: ubuntu-latest
    permissions:
      packages: write
      contents: read

    steps:
      - uses: actions/checkout@v2

      - name: Build image
        run: docker build . --file Dockerfile --tag $IMAGE_NAME --label "runnumber=${GITHUB_RUN_ID}"

      - name: Log in to registry
        run: echo "${{ secrets.GITHUB_TOKEN }}" | docker login ghcr.io -u ${{ github.actor }} --password-stdin

      - name: Push image
        run: |
          IMAGE_ID=ghcr.io/${{ github.repository_owner }}/$IMAGE_NAME

          # Change all uppercase to lowercase
          IMAGE_ID=$(echo $IMAGE_ID | tr '[A-Z]' '[a-z]')
          # Strip git ref prefix from version
          VERSION=$(echo "${{ github.ref }}" | sed -e 's,.*/\(.*\),\1,')
          # Strip "v" prefix from tag name
          [[ "${{ github.ref }}" == "refs/tags/"* ]] && VERSION=$(echo $VERSION | sed -e 's/^v//')
          # Use Docker `latest` tag convention
          [ "$VERSION" == "master" ] && VERSION=latest
          echo IMAGE_ID=$IMAGE_ID
          echo VERSION=$VERSION
          docker tag $IMAGE_NAME $IMAGE_ID:$VERSION
          docker push $IMAGE_ID:$VERSION
Conclusion
What software have you shipped recently while desperately needs container?
Let me know through comments. or on Twitter at @heypankaj_ and/or @time2hack
If you find this article helpful, please share it with others.
Subscribe to the blog to receive new posts right to your inbox.