
Continuous Deployment on DigitalOcean Droplets with Gitlab CI Pipelines
Continuous Deployment for a custom project is challenging. Let's see how to do Continuous Deployment on DigitalOcean Droplets with Gitlab CI Pipelines.


Building the software package and delivering those packages are two parts of automated software delivery.
It is simple when the build is done by the platform where the package is getting deployed, for example, on netlify, Vercel, github pages etc. Still, it gets complicated when the builder separates from the production machine.
Today we will look at achieving Continuous deployment with Gitlab CI Pipelines on DigitalOcean droplets.
Preparing Application
For this, we will continuously try to deploy a NextJS application on the DigitalOcean droplet.
To keep this article concise, let's start with deploying the initial state of the NextJS app you get after bootstrapping the nextjs app with create-next-app:
yarn create next-app --typescript
# or
npx create-next-app --typescript
Now that the NextJS app is up, we will create a Dockerfile with the following text to generate a build image for our NextJS application:
# Install dependencies only when needed
FROM node:16-alpine AS deps
# Check https://github.com/nodejs/docker-node/tree/b4117f9333da4138b03a546ec926ef50a31506c3#nodealpine to understand why libc6-compat might be needed.
RUN apk add --no-cache libc6-compat
WORKDIR /app
COPY package.json yarn.lock ./
RUN yarn install --frozen-lockfile

# If using npm with a `package-lock.json` comment out above and use below instead
# COPY package.json package-lock.json ./
# RUN npm ci

# Rebuild the source code only when needed
FROM node:16-alpine AS builder
WORKDIR /app
COPY --from=deps /app/node_modules ./node_modules
COPY . .

# Next.js collects completely anonymous telemetry data about general usage.
# Learn more here: https://nextjs.org/telemetry
# Uncomment the following line in case you want to disable telemetry during the build.
# ENV NEXT_TELEMETRY_DISABLED 1

RUN yarn build

# If using npm comment out above and use below instead
# RUN npm run build

# Production image, copy all the files and run next
FROM node:16-alpine AS runner
WORKDIR /app

ENV NODE_ENV production
# Uncomment the following line in case you want to disable telemetry during runtime.
# ENV NEXT_TELEMETRY_DISABLED 1

RUN addgroup --system --gid 1001 nodejs
RUN adduser --system --uid 1001 nextjs

# You only need to copy next.config.js if you are NOT using the default configuration
# COPY --from=builder /app/next.config.js ./
COPY --from=builder /app/public ./public
COPY --from=builder /app/package.json ./package.json

# Automatically leverage output traces to reduce image size
# https://nextjs.org/docs/advanced-features/output-file-tracing
COPY --from=builder --chown=nextjs:nodejs /app/.next/standalone ./
COPY --from=builder --chown=nextjs:nodejs /app/.next/static ./.next/static

USER nextjs

EXPOSE 3000

ENV PORT 3000

CMD ["node", "server.js"]
Now that the Dockerfile is in place, we will need to create a Gitlab CI pipeline to build this image and publish it to a container registry.
Continuous Builds
We will publish the image to Gitlab's container registry for this example.
Let's create a Gitlab CI file:
touch .gitlab-ci.yml
In this Gitlab CI file, we will introduce a simple job to build the image and push it to the container registry.
docker-build:
  image: docker:latest
  stage: build
  services:
    - docker:dind
  before_script:
    - docker login -u "$CI_REGISTRY_USER" -p "$CI_REGISTRY_PASSWORD" $CI_REGISTRY
  script:
    - docker build --pull -t "$CI_REGISTRY_IMAGE:latest" .
    - docker push "$CI_REGISTRY_IMAGE:latest"
  # Run this job in a branch where a Dockerfile exists
  rules:
    - if: $CI_COMMIT_BRANCH
      exists:
        - Dockerfile
Let's try the build on CI by pushing to the remote:
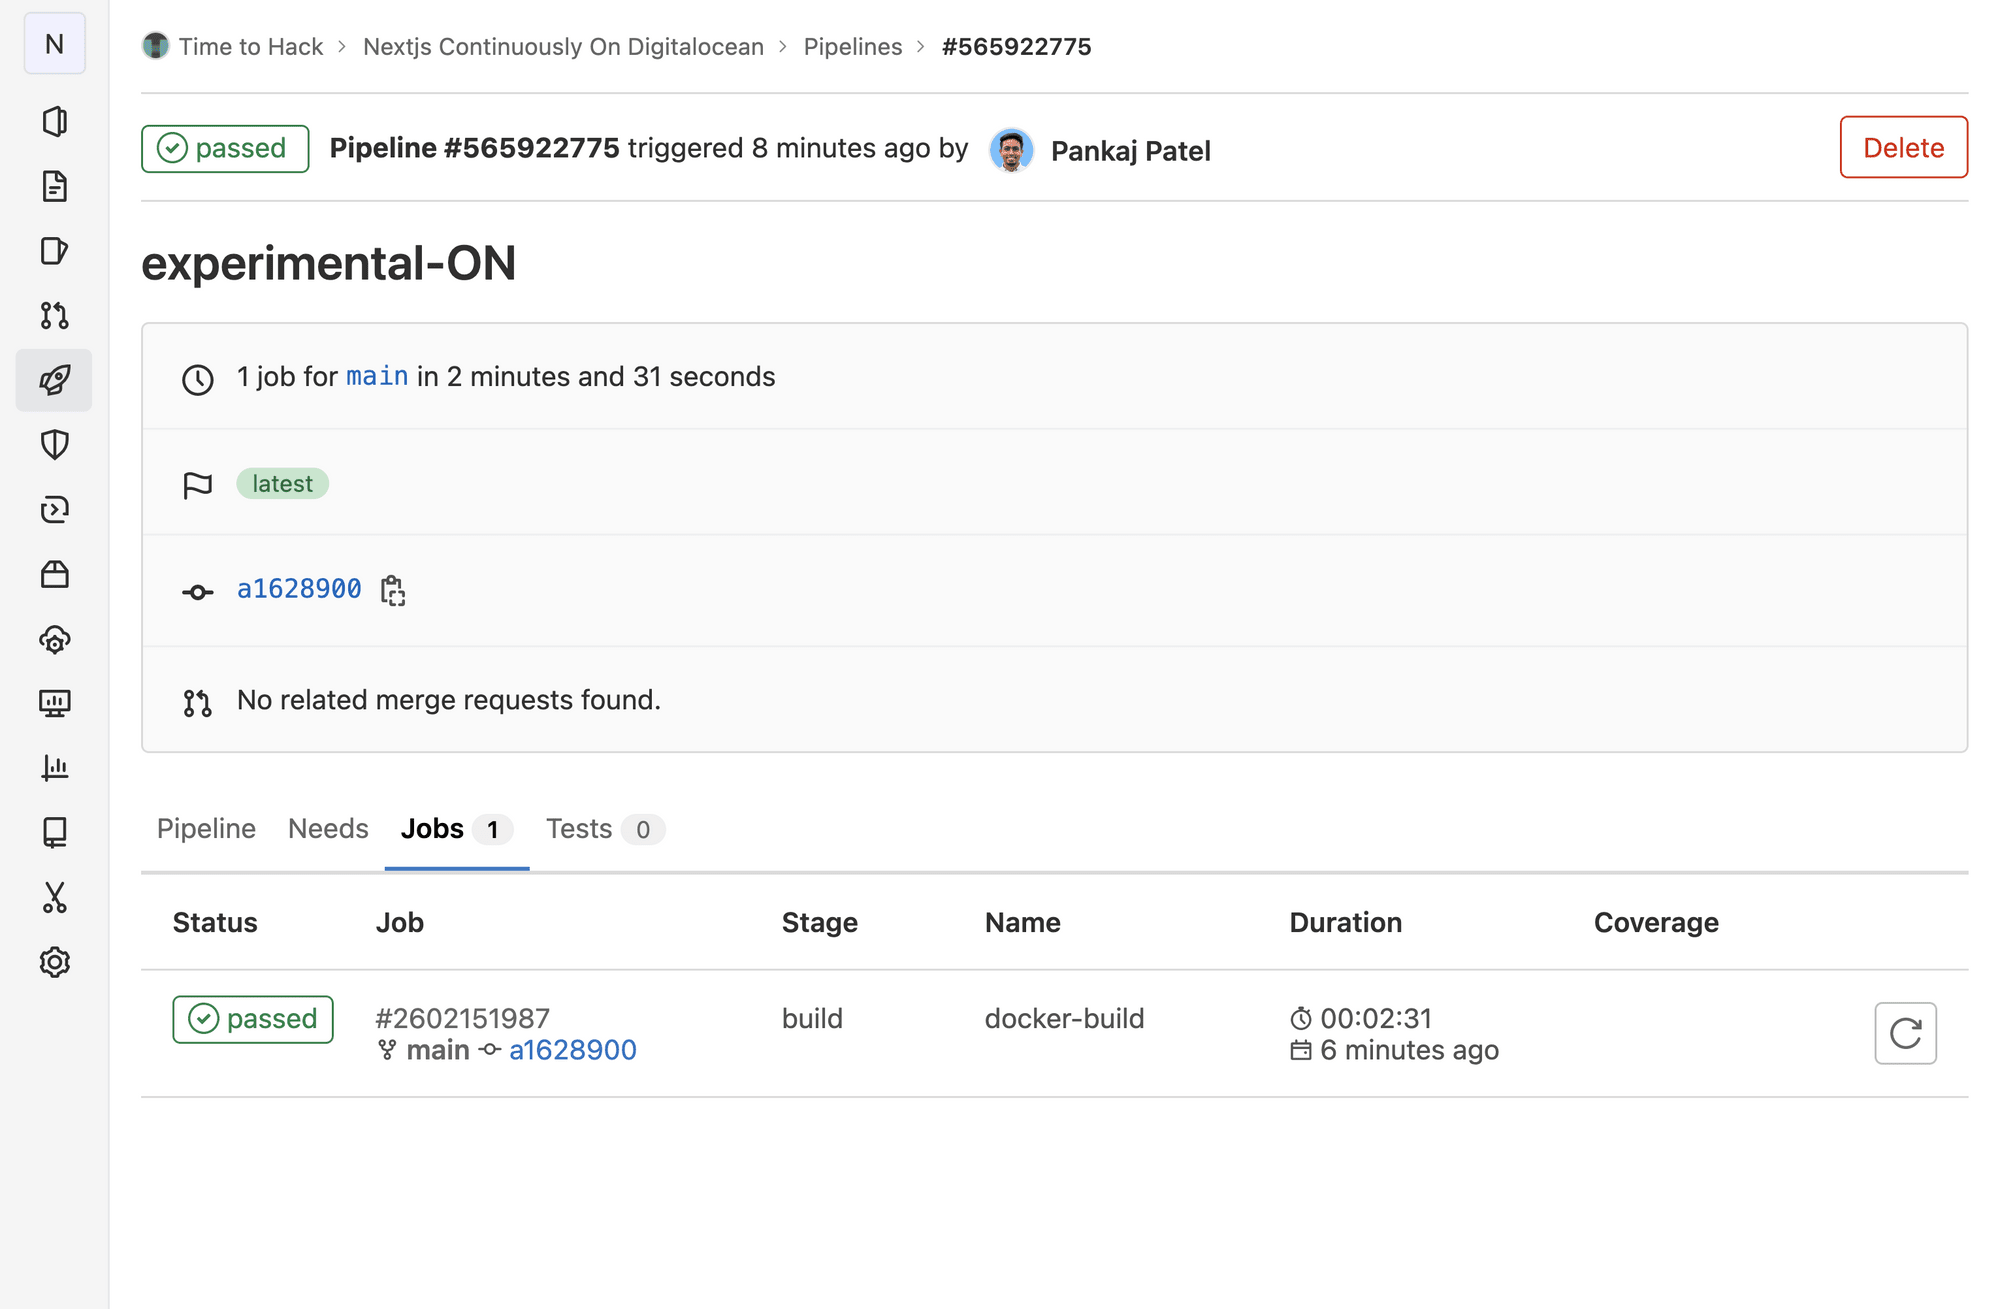
Now that our build is successful, let's set up a Droplet on DigitalOcean. If you don't have a digital ocean account, you can sign up here:


Server Creation & Setup
Once you have your account with you, you can set up your droplet following this guide from DigitalOcean Docs:

Once you have your droplet up and running, let's deploy our NextJS container image on our droplet.
For this, I am assuming that you have added a ssh-key to your droplet, and you can log in to your droplet via ssh with the following command:
ssh [email protected]
# replace xxx.xxx.xxx.xxx with your droblet's public IP
Once you can log in to your droplet, either via ssh (recommended) or via web console, you can install docker with the following commands:
# First, update your existing list of packages:
sudo apt update

# Next, install a few prerequisite packages which let apt use packages over HTTPS:
sudo apt install apt-transport-https ca-certificates curl software-properties-common

# Then add the GPG key for the official Docker repository to your system:
curl -fsSL https://download.docker.com/linux/ubuntu/gpg | sudo apt-key add -

# Add the Docker repository to APT sources:
sudo add-apt-repository "deb [arch=amd64] https://download.docker.com/linux/ubuntu focal stable"
# This will also update our package database with the Docker packages from the newly added repo.

# Make sure you are about to install from the Docker repo instead of the default Ubuntu repo:
apt-cache policy docker-ce

# You’ll see output like this, although the version number for Docker may be different:
# > docker-ce:
# >  Installed: (none)
# >  ...
# Notice that docker-ce is not installed, but the candidate for installation is from the Docker repository for Ubuntu 20.04 (focal).

# Finally, install Docker:
sudo apt install docker-ce

# Docker should now be installed, the daemon started, and the process enabled to start on boot. Check that it’s running:
sudo systemctl status docker
# > ● docker.service - Docker Application Container Engine
# >    Loaded: loaded (/lib/systemd/system/docker.service; enabled; vendor preset: enabled)
# >    Active: active (running) since Tue 2020-05-19 17:00:41 UTC; 17s ago
# >    ...
Note: I have borrowed this set of commands from the Docker community tutorial:
Brian Hogan
Once this is done and you have a docker engine running in your droplet, we are ready to deploy our application.
First Deployment
But first, we need to have our small infrastructure present as code somewhere. And to do so, we will create another repository to host the container initialization file i.e. docker-compose.yml file.
Here is the docker-compose.yml file:
version: "3.4"

services:
  frontend:
    container_name: front
    image: registry.gitlab.com/time2hack/digital-ocean-ci/nextjs-on-digitalocean:latest
    environment:
      - "NEXT_TELEMETRY_DISABLED=1"
    restart: always
    ports:
      - "80:3000"
The above docker-compose file is doing the following things:
- It uses version 3.4 of the docker-compose YAML specification
- Creates a service named
frontend - Set the container name of the service as
front - Specifies the image to use from the container registry
- In this case, it is:
registry.gitlab.com/time2hack/digital-ocean-ci/nextjs-on-digitalocean:latest - For different registries, you might need to login into those registries before pulling the images from them
- In this case, it is:
- Marks this service to be always restarted in case it gets shut down automatically
- Maps the ports from the container to the OS
- Port
3000of the container is mapped to port80of the OS
- Port
Now head over to the DigitalOcean droplet and log in via SSH/Web Console.
We will follow the following simple steps to deploy our app on Droplet:
- Navigate to the home directory with
cd ~ - Clone the repository in a droplet with
git clone https://gitlab.com/time2hack/digital-ocean-ci/nextjs-deployment.git - Move to the newly cloned repo with
cd nextjs-deployment - Start the container
docker-compose up -d - You should see output like the following:
root@xxxxx:/home/t2h/nextjs-deployment#
docker-compose up -d
>>>>>>>>>>
Pulling front_end (registry.gitlab.com/time2hack/digital-ocean-ci/nextjs-on-digitalocean:latest)...
latest: Pulling from time2hack/digital-ocean-ci/nextjs-on-digitalocean
2408cc74d12b: Already exists
5b80453a567d: Already exists
3420de6432e1: Already exists
65b549a28248: Already exists
93146c325fa7: Pull complete
0e62824b8055: Pull complete
68e6b293a6f0: Pull complete
37f95b8329f4: Pull complete
a366af5ead1a: Pull complete
d6a22ed87ddf: Pull complete
f5c7eb3549e4: Pull complete
Digest: sha256:5423ca9170b5e059357fae12db22dda5715d283fc4c026938e14883b4880493a
Status: Downloaded newer image for registry.gitlab.com/time2hack/digital-ocean-ci/nextjs-on-digitalocean:latest
Recreating front_end ... done

root@xxxxx:/home/t2h/nextjs-deployment#
The above output says that our container is created from the image, and we can check the status with docker ps -al
It encourages me a lot to share more of my learnings.
Now we are halfway done, we want to auto-deploy this image as soon as we finish building the image.
Continuous Deployment
This process is simple in theory but needs precision as we might expose ourselves to security vulnerabilities.
- Create a fresh pair of Public-Private keys with
ssh-keygen- I got the guide from SSH Academy to generate a pair of keys
- I used to use
RSA, but now, I use ed25519 as my algorithm to generate keys.
- Our CI will present itself as the
root, for that CI must have a Private Key that pairs with a Public key on the server. - We will add a Private Key in the environment variables and populate in the runner on runtime
- Login to Droplet and execute the commands to refresh the Container with the newly published image.
Generating Key Pair
We will generate the keys with the following command:
ssh-keygen -t ed25519 -c "[email protected]"
This will ask for the path and the passphrase for the keys. If you already have some keys in place, enter a new path for the keys. As for the passphrase, I am leaving it empty for this case.
Once the key is generated, copy them from the mentioned path. If you have not mentioned anything, it will be id_ed25519 and id_25519.pub files as Private and Public Keys
Adding Private Key to CI Secrets
Navigate to the CI/CD Settings section of your repository in GitLab.
Usually, it is on the path /-/settings/ci_cd from your Repository's Project Home. For my Project, https://gitlab.com/time2hack/digital-ocean-ci/nextjs-deployment/ the settings are located at https://gitlab.com/time2hack/digital-ocean-ci/nextjs-deployment/-/settings/ci_cd
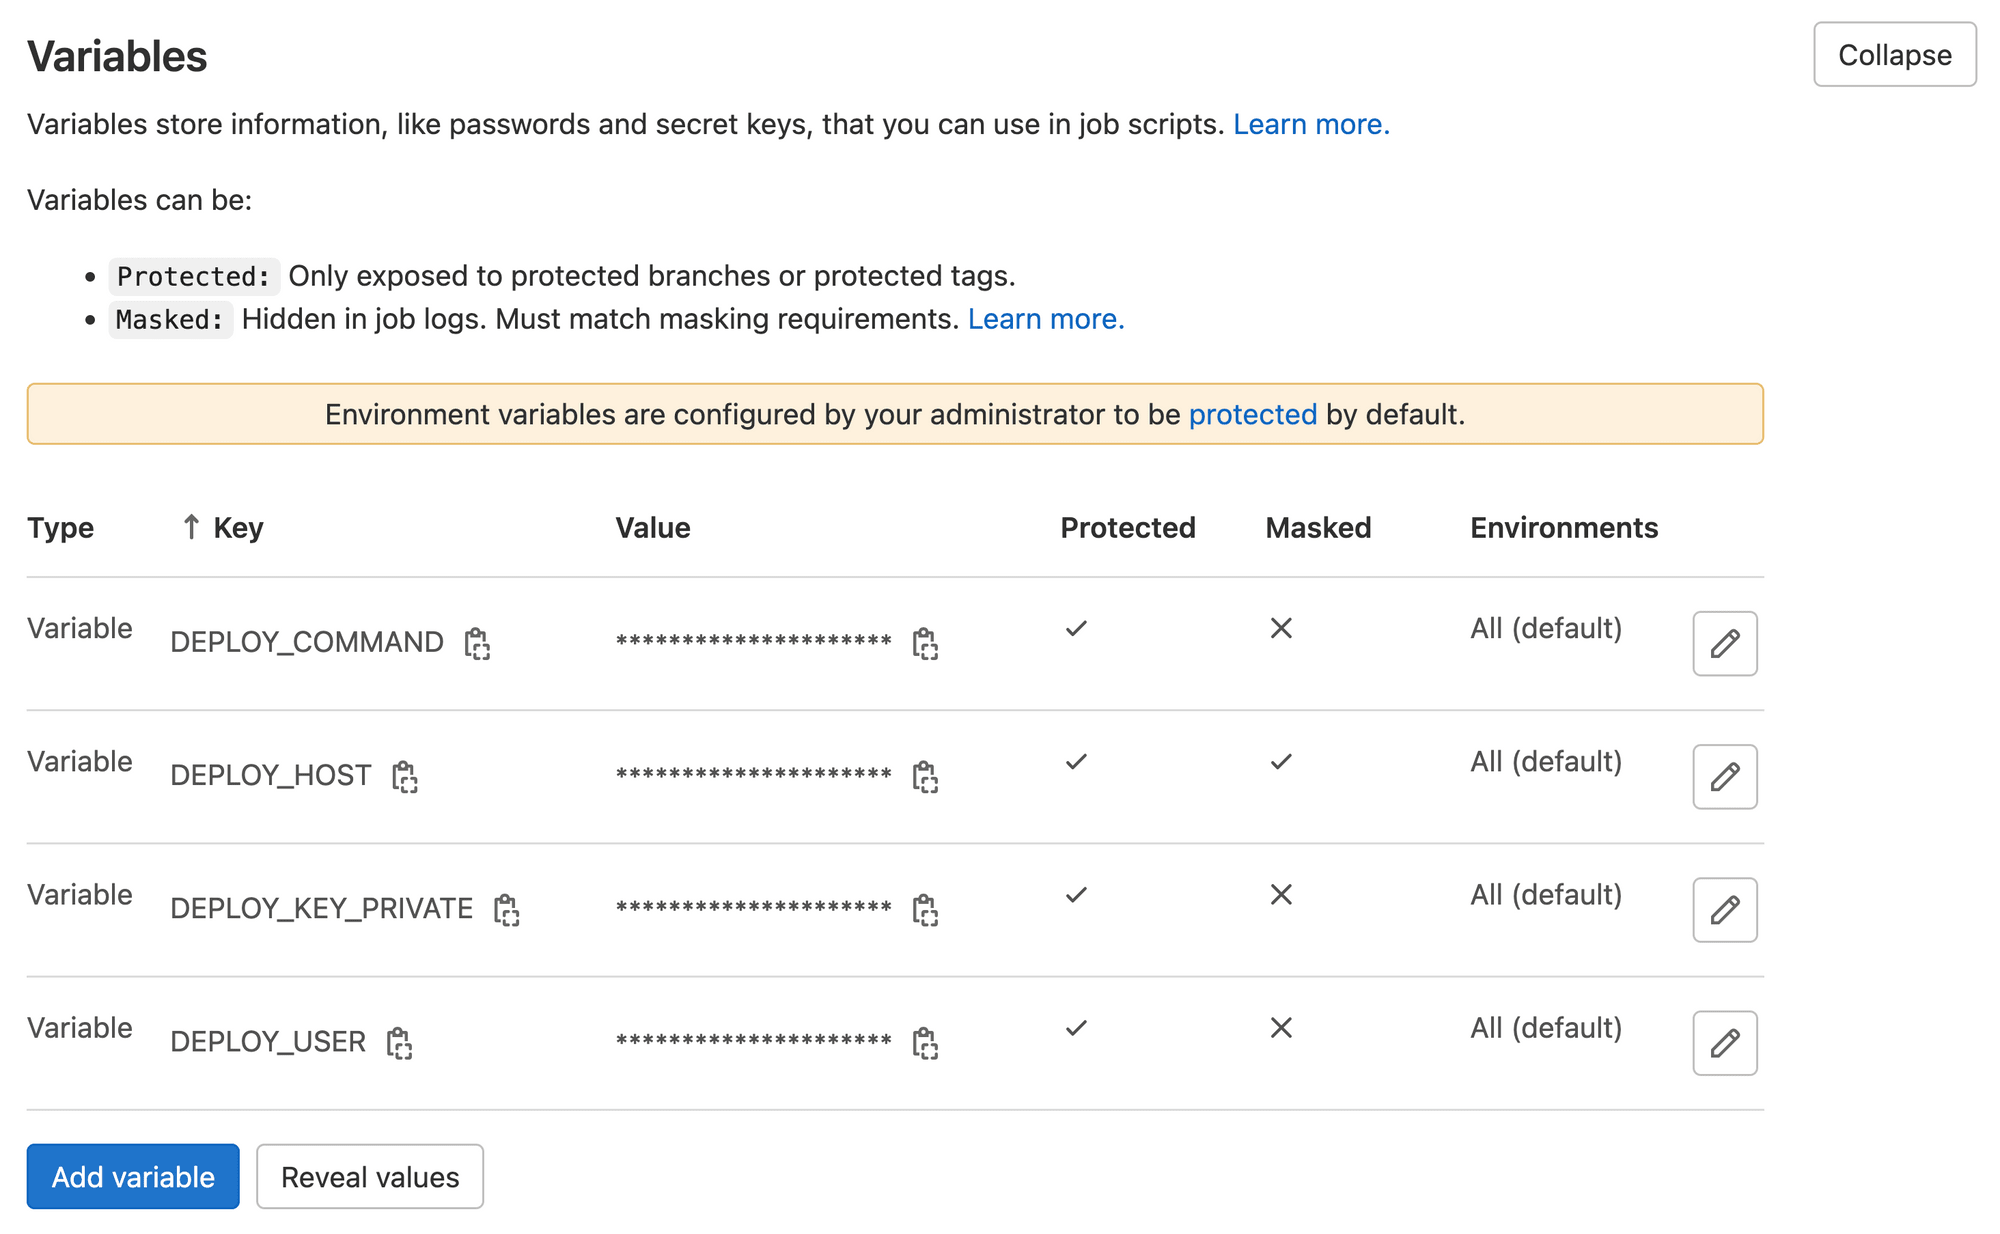
You should locate the Variables section on the CI/CD settings page and expand it. It will look like the following:
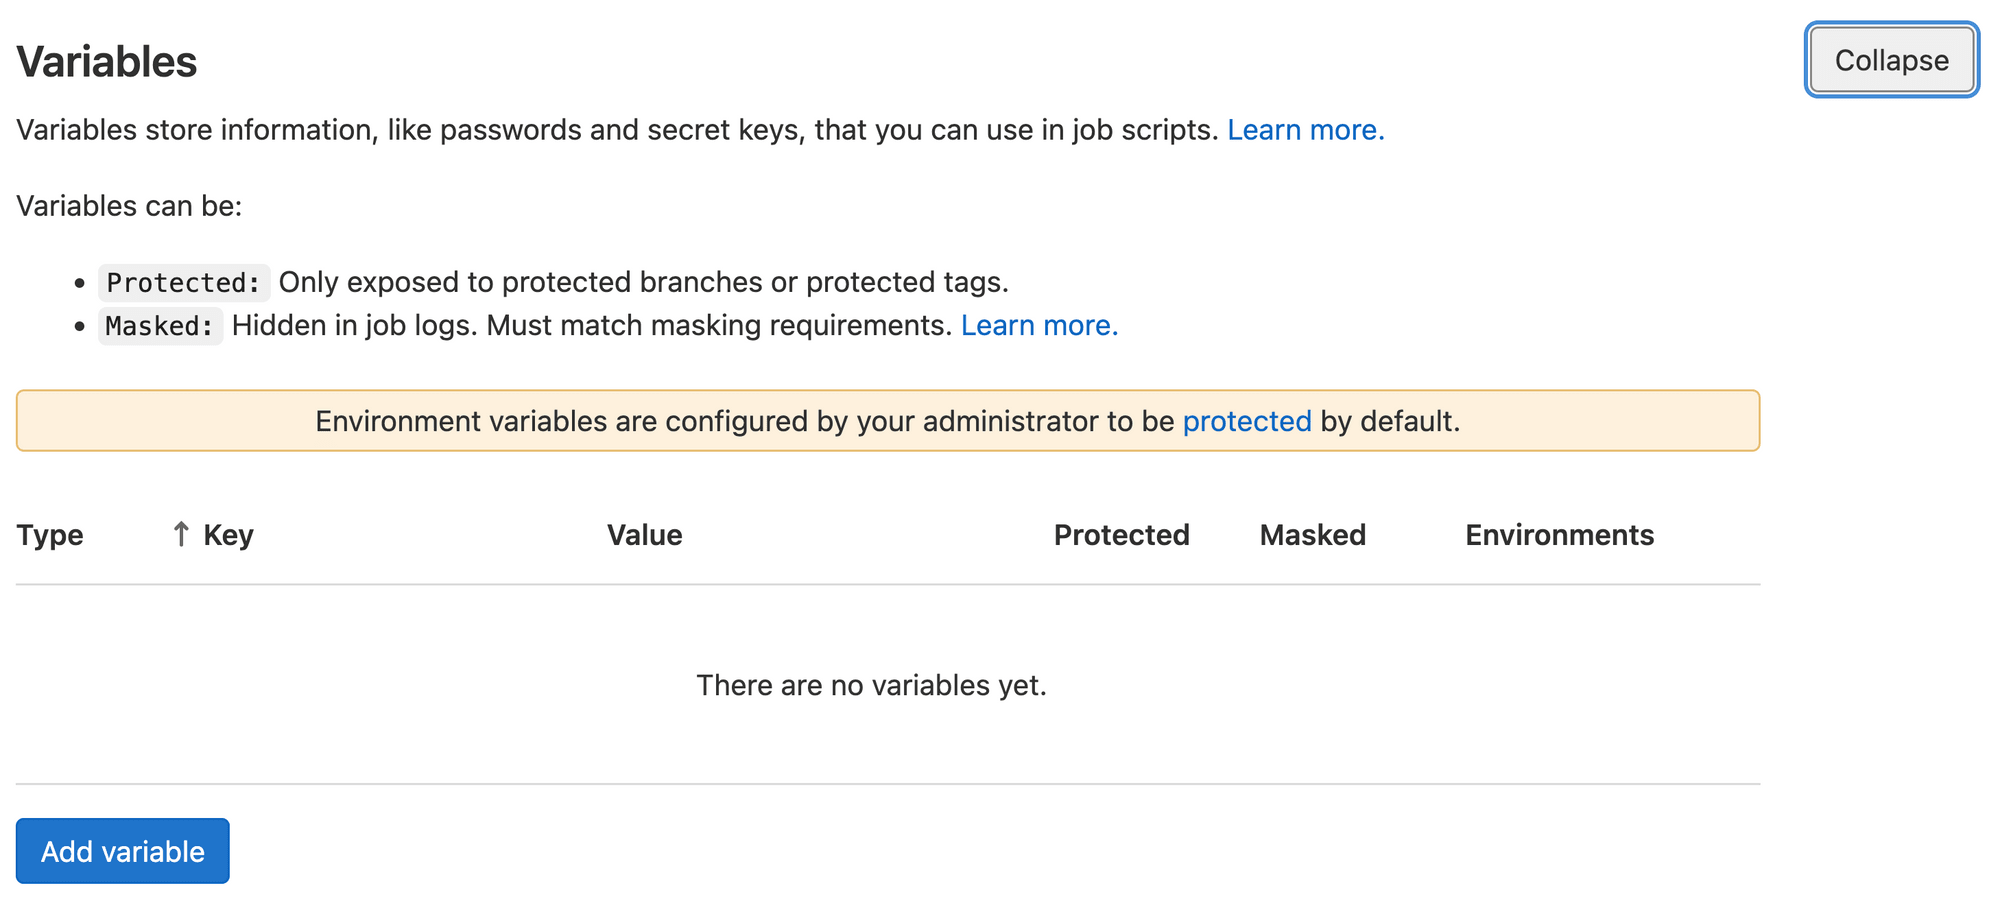
Once you add the following necessary variables:
DEPLOY_KEY_PRIVATEYour freshly generated private keyDEPLOY_USERas the user for ssh login,rootin this caseDEPLOY_HOSTas the server addressxxx.xxx.xxx.xxxDEPLOY_COMMANDthe final command that needs to be executed to deploy the application.
As it is a Docker image, we need to recreate the container, so out DEPLOY_COMMAND will be docker pull registry.gitlab.com/time2hack/digital-ocean-ci/nextjs-on-digitalocean:latest; cd ~; cd apps/next-deployment; docker-compose up -d;
It should look like the following:
Adding Public Key to the Droplet
Now from the generated pair, we need to add the Public key to the Droplet so that when the deployment runner tries to log in, the Keys are accepted.
We will copy the contents of /.ssh/id_ed25119.pub and put it in the new line at the end of /.ssh/authorixed_keys the file of the droplet.
You can log in via ssh and do so few minutes.
In case of any trouble, there is this detailed tutorial from the DigitalOcean community:
Now with variables in place, we will add a .gitlab-ci.yml file on our deployment repo with the following content:
deploy:
  stage: deploy
  image: alpine
  environment:
    name: production
  before_script:
    - apk add openssh-client
    - eval $(ssh-agent -s)
    - mkdir -p ~/.ssh
    - chmod 700 ~/.ssh
    - echo -e "$DEPLOY_KEY_PRIVATE" > ~/.ssh/id_ed25519
    - chmod 700 ~/.ssh/id_ed25519
    - echo "$DEPLOY_KEY_PRIVATE" | tr -d '\r' | ssh-add -
  script:
    - |
      ssh -o StrictHostKeyChecking=no "$DEPLOY_USER@$DEPLOY_HOST" ""$DEPLOY_COMMAND""
And commit this file to the repository and push it to the remote.
Our Continuous Deployment script is in place with the above file in place. But we still need a trigger from the builder pipeline.
To do so, we need to add the following lines in the builder repo's .gitlab-ci.yml file:
...

trigger-deploy:
  trigger:
    project: time2hack/digital-ocean-ci/nextjs-deployment
You can read the brief intro on cross-project pipelines here:

After committing this file to the repo and pushing it, we will be able to see the build-in builder as:
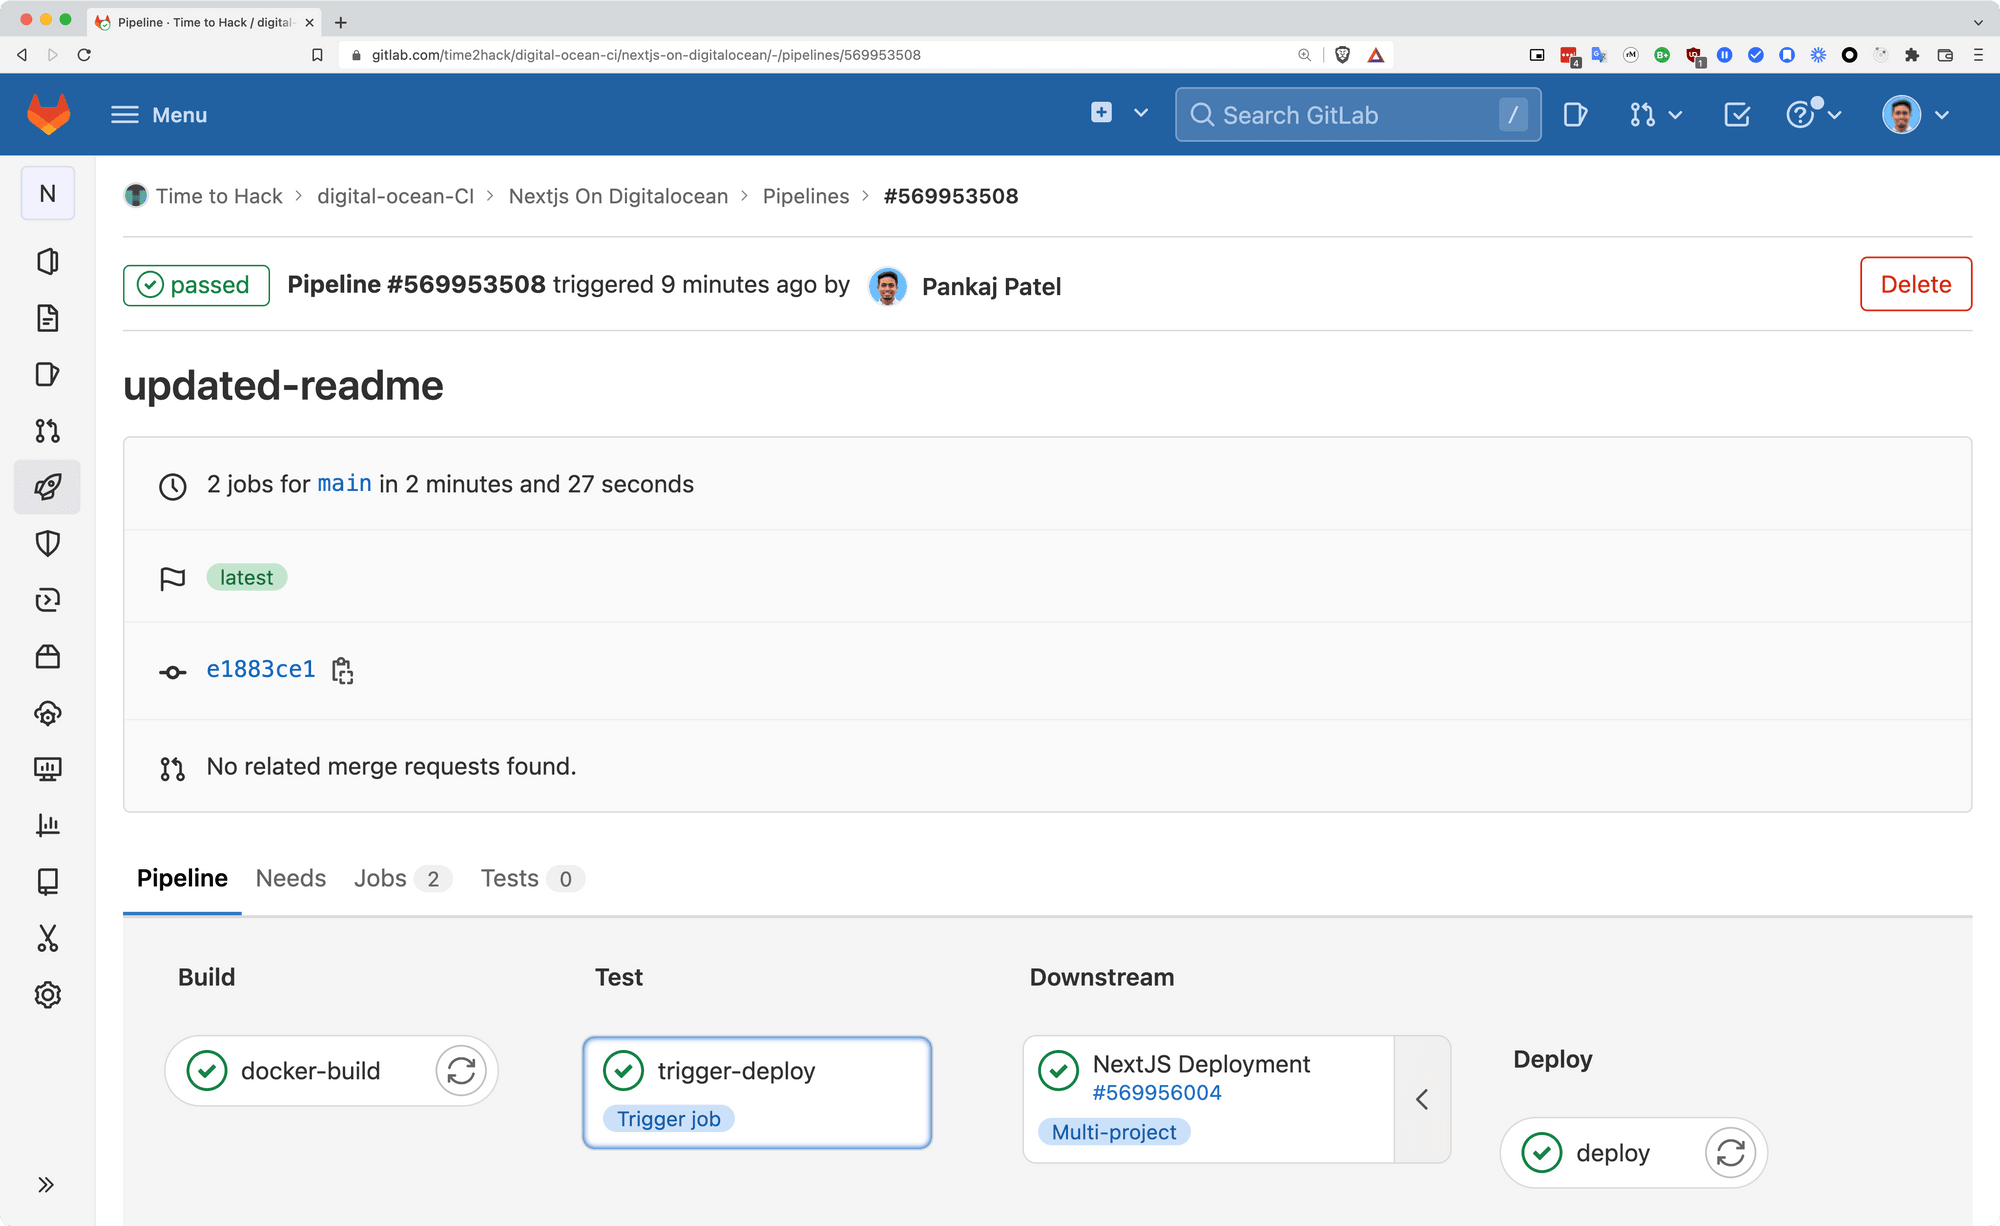
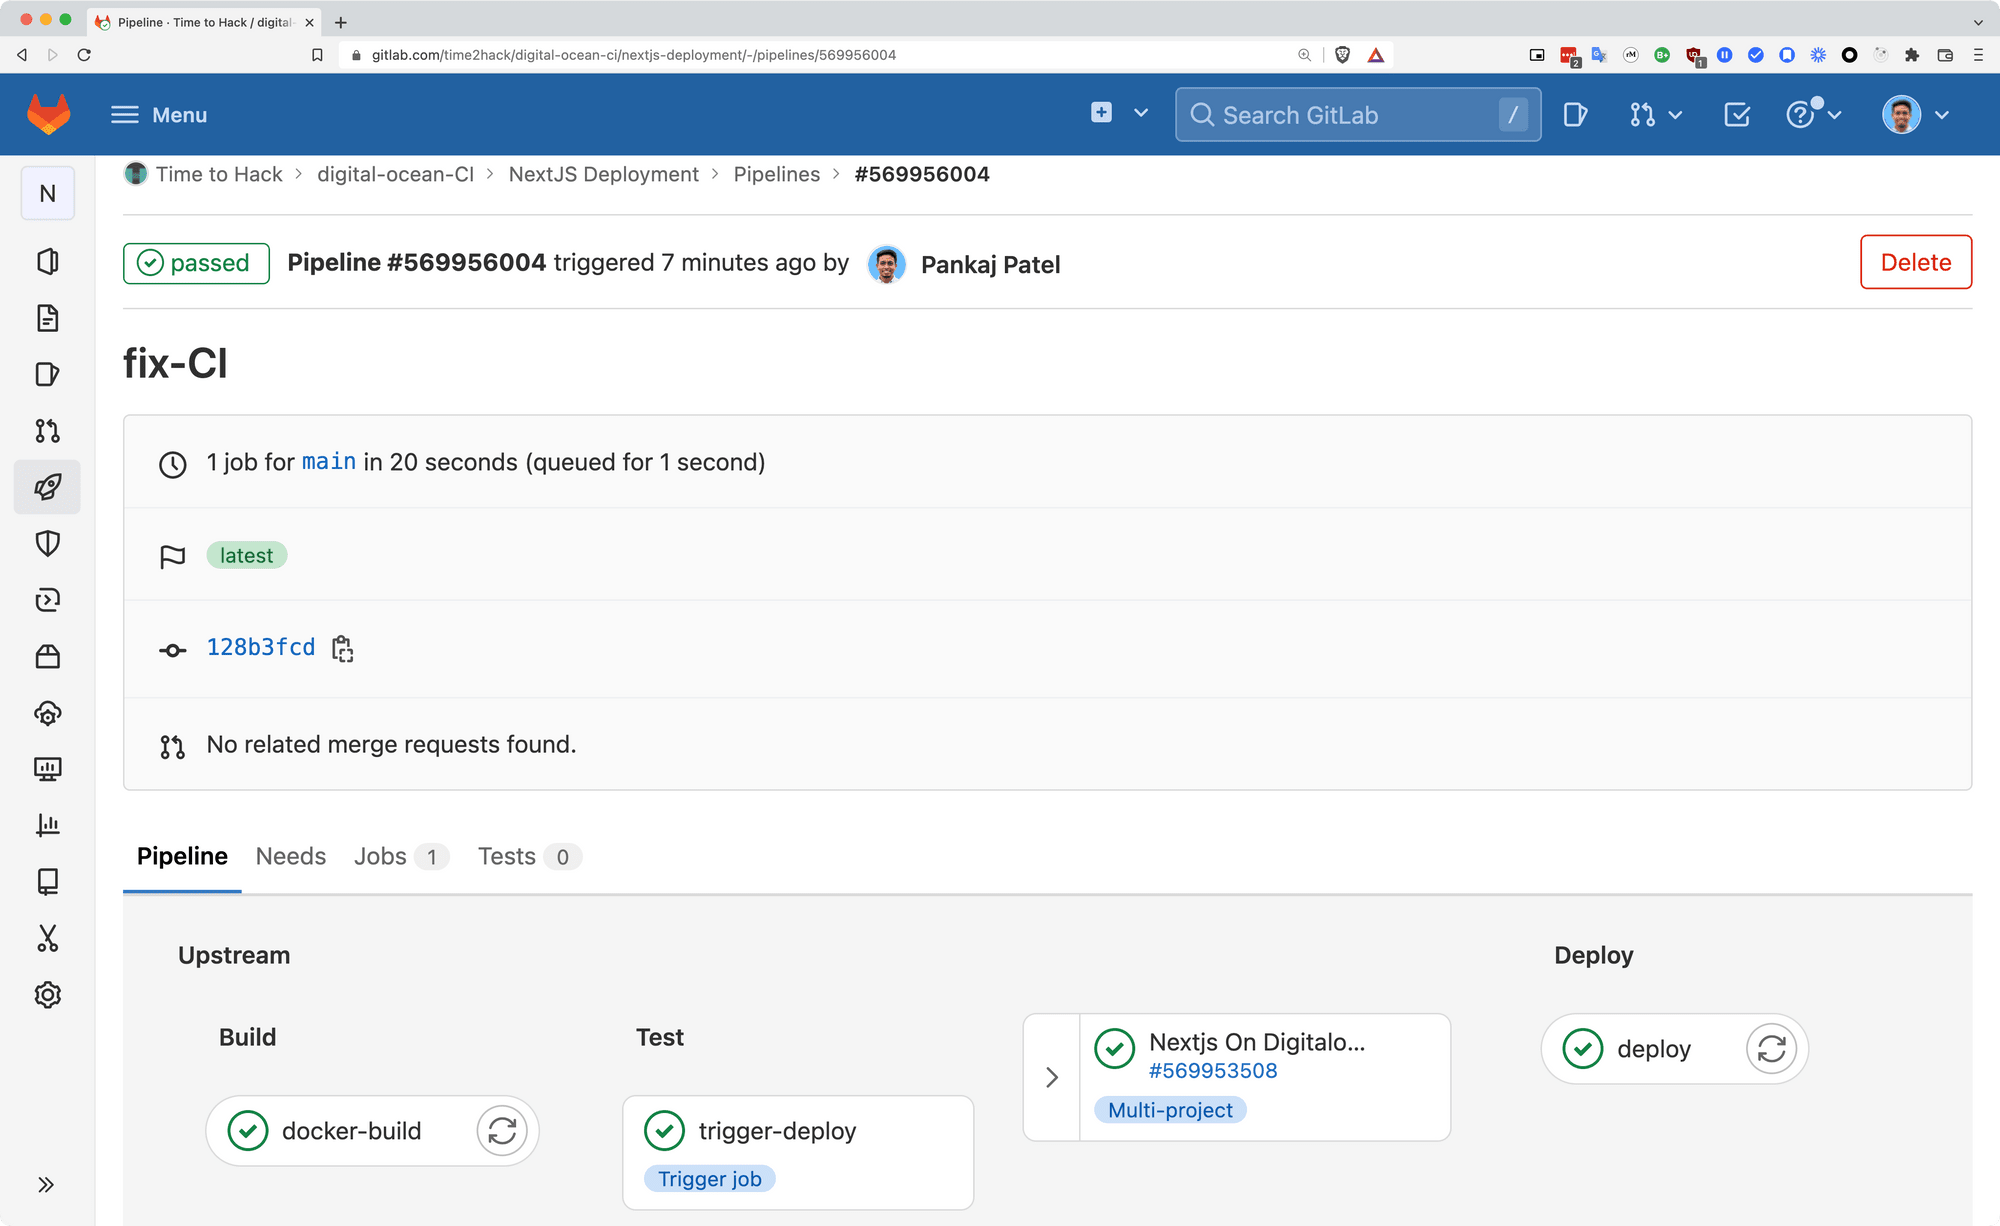
Where the failed step is from the deployment repo's pipeline.
This is what it looks like:

and when expanded, it will look like this:
Conclusion
In a nutshell, we saw how to prepare the project for
- Continuous Build on Gitlab
- Deployment configuration as code
- Continuous Deployment on DigitalOcean with cross-project pipeline triggers
Let me know through comments. or on Twitter at @heypankaj_ and/or @time2hack
If you find this article helpful, please share it with others.
Subscribe to the blog to receive new posts right to your inbox.