
Getting started with Eleventy (11ty)
JAMStack is fast for the development & delivery of fast websites & Static Site Generation is one of the ways. Eleventy (11ty) is the easiest Static Site Generator

JAMStack is Fast. Fast for Development and delivery of ultra Fast websites.
To develop with JAMStack, one of the ways is Static Site Generation.
Static Site Generators (SSG)
SSGs are the tools which will take the data from any data source and generate Static HTML pages.
Static Sites are way faster than any dynamic site because:
- No content is generated on runtime, which means no time is spent in this process
- The server doesn’t have to match the dynamic URLs. HTML files are delivered straight to the browser without any Route/URL matching
- As the content is Static, it will be cached for a longer time
- Again, being Static, the websites can be delivered through CDNs. This way, users don’t have to wait long for the response.
And to build WebSites with SSGs, Eleventy (11ty) is a fast and easy-to-use tool.
Eleventy (11ty)
11ty is a JavaScript alternative to Jackyl. It’s built with no configuration in mind. Though, it supports many templating languages; for example, MarkDown, Pug, Handlebars etc.
We will make a simple Blogging website with the following features in consideration:
- Index Page with
- Blog Intro
- List of Posts
- Blog Post page
- Tags with Tag Index
- Comments with Disqus
- Deployed on Netlify
First, we need to create a Project and add 11ty as the dev dependency, let's do that with the following commands:
# make project directory
mkdir awesome-blog

# switch to the project directory
cd awesome-blog

# initialize the Node Project
yarn init -y

# Add 11ty as a dev dependency
yarn add -D @11ty/eleventy

# open VS Code in the directory
# (if you use VSCode and have set up CLI command)
code.
Now we edit the package.json file to add the following to the scripts:
{
  ...
  "scripts" : {
    "start" : "eleventy --serve"
  },
  ...
}
After adding start script in the package.json, launch yarn start on the root of your project directory from CLI.
Now that 11ty is up and running, we need to add some content to see it building.
By default, 11ty will output the generated HTML files in _site directory.
Let's go ahead and create our index page with index.md file in the root of the project as:
# Hello World
---
Welcome to the `awesome-blog`
Which will get generated as the following body in _site/index.html:
<h1>Hello World</h1>
<hr>
<p>Welcome to the <code>awesome-blog</code></p>
Well, that was super simple; and blank with no CSS. Let's try to add some Style by adding Bootstrap CSS.
But where do we add them? This is where layouts in the 11ty come into play.
As the name suggests, Layouts are the Page Generator Templates where the selected page can fill the data.
The layouts must be inside the _includes directory.
Let's try to make a Handlebar layout as home.hbs for the home page:
<!DOCTYPE html>
<html lang="en">
<head>
  <meta charset="UTF-8">
  <meta name="viewport" content="width=device-width, initial-scale=1.0">
  <title>{{ title }}</title>
  <link rel="stylesheet" href="//stackpath.bootstrapcdn.com/bootstrap/4.5.2/css/bootstrap.min.css" />
</head>
<body class="p-3">
  <div class="container">
    {{{content}}}
  </div>
</body>
</html>
We need to add some context to our markdown file to use the above template. We will add the context with the FrontMatter format inside the markdown.
FrontMatter is the data format to git more contextual data about the file. For a blog post, it can be a title, tags etc. A landing page can appear with Sections, Images and other blocks of information.
For our markdowns, we will add title and tags in the front matter all the time and use it in our layouts.
So with decided FrontMatter, here is our index.md:
---
layout: layouts/home.hbs
title: Hello World
tags: [intro, random, gif]
---
# Hello World
---
Welcome to the `awesome-blog`
Here we will add some awesome gifs rolling around the internet.
Starting with this:

Now we have the Title repeating two times, we will keep the FrontMatter and remove it from the content of the markdown to make it as follows:
---
layout: layouts/home.hbs
title: Hello World
banner: https://placeimg.com/1000/480/nature
tags: [intro, random, gif]
---
Welcome to the `awesome-blog`
Here we will add some awesome gifs rolling around the internet.
Starting with this:

And with this, we will update our layout as follows inside the body:
<body class="p-3">
  <div class="container">
    <h1>{{title}}</h1>
    {{#if banner}}
      <img src="{{banner}}" alt={{title}} />
    {{/if}}
    {{#if tags}}
      <div class="tags">
        {{#each tags}}
          <div class="badge badge-dark">{{this}}</div>
        {{/each}}
      </div>
    {{/if}}
    <hr />
    {{{content}}}
  </div>
</body>
Now with basics in mind, we want to make the blog posts and all the posts listed on the homepage.
In 11ty, by default, the HTML files will be generated in the same directory structure as the data file. And the URLs will be like the data file names.
So, in our case, we can make all the posts inside the posts directory with post slug as the file-names
And our Markdown files will follow the following structure:
/
├── index.md
└── web
    ├── hello-world.md
    ├── ...
    └── trip-to-new-york.md
Now we need to add these post lists to the Home Page.
For this, let’s make a rough try making the post's data in the FrontMatter of the Home Page and create a new layout for it.
For the list of posts, I will approach the data of the front matter as follows:
title: Home
posts:
- 0:
  title: Hello World
  url: posts/hello-World/
  banner: //source.unsplash.com/user/pankajpatel/1024x400
- 1:
  title: Random Post
  url: posts/random/
  banner: //source.unsplash.com/user/pankajpatel/likes/1024x400
And the layout can be changed to the following:
<body class="p-3">
  <div class="container text-center">
    <h1 class="m-5">{{title}}</h1>

    {{#if posts}}
      <div class="row">
        {{#each posts}}
          <a class="col mb-3 text-decoration-none" href={{this.url}} data-index={{@key}}>
            <article class="card" href={{this.url}} data-index={{@key}}>
              <img src="{{this.banner}}" class="card-img-top" alt="{{this.title}}">
              <div class="card-body text-left">
                <h1 class="card-title font-weight-light">{{this.title}}</h1>
                <p class="card-text"><small class="text-muted">Last updated 3 mins ago</small></p>
              </div>
            </article>
          </a>
        {{/each}}
      </div>
    {{/if}}
    <hr />
  </div>
</body>
But this FrontMatter data were prepared manually. What can we do to build it automatically?
It’s time to get our hands dirty with configuration files.
For 11ty, the config file is .eleventy.js
In 11ty’s config file, there needs to be one exported function. This function accepts the current eleventyConfig.
The current eleventyConfig has some API methods to define different behaviours like:
- Adding/Modifying the collection
- Adding new filters
- etc
For us, the concerned part is to add a new collection for our posts and use this collection to list the posts on the homepage.
To get the collection of all the posts, we created FrontMatter data type. And for all the posts, we set the type as post
Now our 11ty config looks like the following:
module.exports = (eleventyConfig) => {
  eleventyConfig.addCollection("posts", (collection) => {
    return collection.getAll().filter((item) => {
      return 'type' in item.data && item.data.type === 'post'
    })
  })
}
Now with the above added posts collection, we can update our homepage template as follows:
<body class="p-3">
  <div class="container text-center">
    <h1 class="m-5">{{title}}</h1>

    {{#if collections.posts}}
    <div class="row">
      {{#each collections.posts}}
      <a class="col mb-3 text-decoration-none" href={{this.data.page.url}} data-index={{@key}}>
        <article class="card" href={{this.data.url}} data-index={{@key}}>
          {{#if this.data.banner}}
            <img src="{{this.data.banner}}" class="card-img-top" alt="{{this.data.title}}">
          {{/if}}
          <div class="card-body text-left">
            <h1 class="card-title font-weight-light">{{this.data.title}}</h1>
            <p class="card-text"><small class="text-muted">Last updated 3 mins ago</small></p>
          </div>
        </article>
      </a>
      {{/each}}
    </div>
    {{/if}}
    <hr />
  </div>
</body>
Now that our homepage and posts are ready, we can publish it.
To publish our site, first, we need a git repository and commit the changes.
git init
echo "node_modules\n_site" > .gitignore
git add .
git commit -m "? personal blog launch initiated"
Now you have committed the code on your local repo. You can create a repository on GitHub and add a remote to your local repo. Then you can push your branch, and it is available remotely.
Now it is time to publish our blog through this repository.
The following are the way to publish the website:
Publish on Netlify
Netlify publishes a matter of a few clicks.
- Log into Netlify with Github from here: Netlify App
- Click on
New Site from Gitbutton - Connect to your Github if not connected
- Select the repo that you had before created
- Netlify will detect the type of Project and will suggest a build command
- Click on
Deploy Site - Your site is deployed
You can watch the following video to see the above steps in action:
Publish on GitHub Pages
To publish on GitHub pages, you need to add a build script to your package.json
You can do so by adding the following line to the scripts:
{
  ...
  "scripts" : {
    "build" : "eleventy",
    "start" : "eleventy --serve"
  },
  ...
}
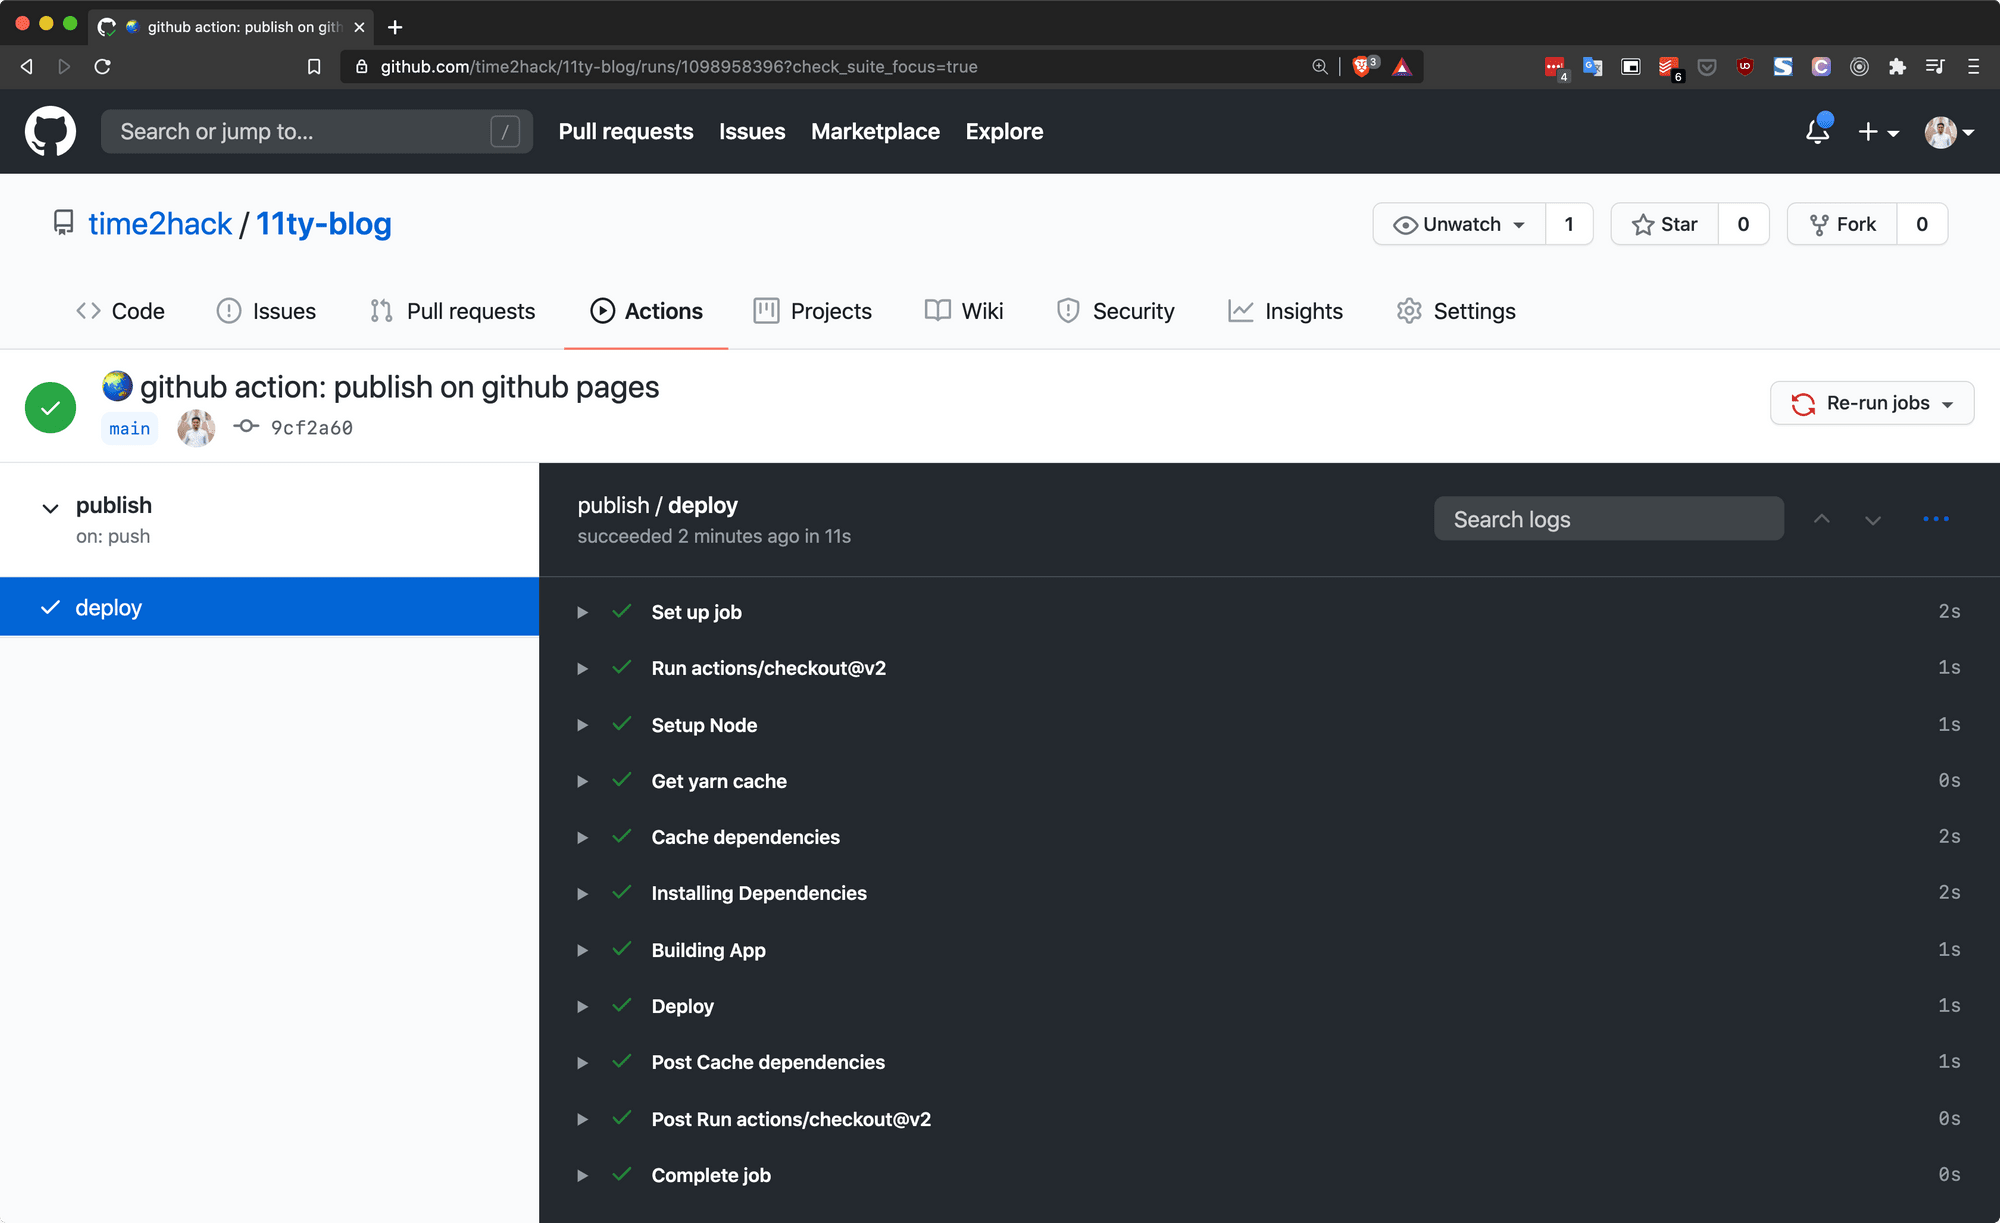
Now that the build script has been added. We need to add GitHub action to Auto Publish our site to Github Pages. Following is the YAML file placed at .github/workflows/publish.yaml
name: publish

on:
  push:
    branches:
      - master

jobs:
  deploy:
    runs-on: ubuntu-18.04
    steps:
      - uses: actions/checkout@v2

      - name: Setup Node
        uses: actions/setup-node@v1
        with:
          node-version: "12.x"

      - name: Get yarn cache
        id: yarn-cache
        run: echo "::set-output name=dir::$(yarn cache dir)"

      - name: Cache dependencies
        uses: actions/cache@v1
        with:
          path: ${{ steps.yarn-cache.outputs.dir }}
          key: ${{ runner.os }}-yarn-${{ hashFiles('**/yarn.lock') }}
          restore-keys: |
            ${{ runner.os }}-yarn-

      - name: Installing Dependencies
        run: yarn install

      - name: Building App
        run: yarn build

      - name: Deploy
        uses: peaceiris/actions-gh-pages@v3
        with:
          github_token: ${{ secrets.GITHUB_TOKEN }}
          publish_dir: ./_site
Now you need to enable the GitHub pages from your repository’s Settings.

Now commit and push the above file. This will trigger the build and publish the site.
Jumpstart with Starters
Starter Repositories or Template repositories are the best ways to start with the 11ty site creation.
The most basic one you can start with is the 11ty Base Blog:
 11ty
11ty
Another one worth recommending is from Google:
googleThe one with a modern Front End Toolchain:
ianrose
And everything excellent about 11ty:
scottishstoater
Conclusion
11ty is loved and recommended by many people. And after using it for a while, I also think it is the simplest Static Site Generator.
What do you think?
Let me know through comments ? or on Twitter at @heypankaj_ and/or @time2hack.
If you find this article helpful, please share it with others ?
Subscribe to the blog to receive new posts right in your inbox.
Credits
Photo by Andrew Neel on Unsplash
Updates
- 13 Dec 2020: Added Starters
- 03 Jan 2021: Added more starters